Introduction to the Human Skull for Portrait Artist
When I scroll through some of my favourite social media channels I often wonder why so many artists struggle with sculpting and also drawing portraits. The art work often shows a lot of promise, however it is missing something that prevents it from standing out.
Having spent years working on projects related to human anatomy, I’ve discovered that most artwork can be improved upon with a few simple tips and tricks. This is the reason why I decided to create Human Skull for Portrait Artists, a collection of helpful illustrations and instructions on how to craft realistic representations of the human head and face.
Google can offer up many useful resources on this topic, but it is difficult to filter out what’s useful, and most important, what is accurate. It is easy to get overwhelmed but the truth is, there are a few key rules that every portrait artist should know.
First, we need to understand the main building blocks of the human face. The bones and primary shapes, the core foundation of the face.

The human skull is composed of 22 bones that provide the architectural framework of the head and face. At first this can look complicated but when we break the skull down to primitive shapes and forms it becomes easier to navigate. We will start with the larger shapes and work our way down to finer details.
The Cranial Part
When you are facing a big task, it is always best to divide it into smaller and more manageable pieces. Therefore we will split the skull into two equal parts, the cranial and facial masses.
When viewing the skull from the front (or anterior position in anatomical parlance) you can see that both the facial and cranial masses take up the same amount of space. They are divided at the midline of the head. However, from a profile view, you can see that the cranial mass makes up the bulk of the skull.
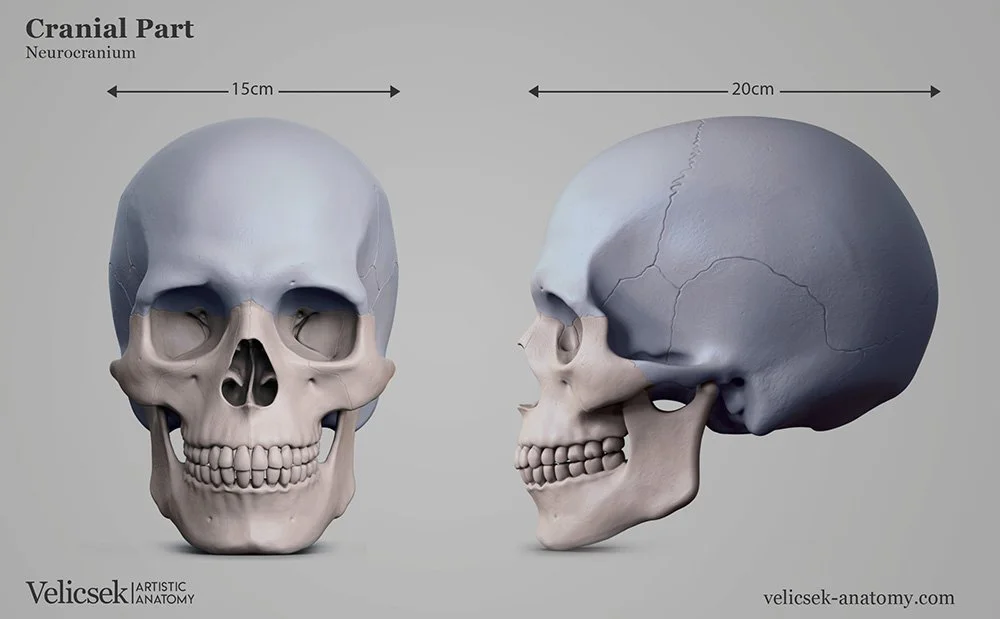
The reason why the cranium takes up so much space in comparison to the face, is because it performs the important role of housing and protecting the brain. However, humans are naturally predisposed to focus on faces, which is why it is a common mistake to represent the cranium smaller than it really is in size. It is important to know that the cranium is roughly 15cm x 20cm. Moreso, the width of the cranium’s profile is 20cm, almost equal to the height of the entire head (23cm)!!
The cranium has a smooth and rounded surface, shaped somewhat like an egg. A simple shape that is made up of 8 symmetrical bones. If you’re curious to know what they are, they are called: the Frontal, Parietal, Occipital, Temporal, Sphenoid and Ethmoid bones.
The Facial Part
Next we will look at the facial mass. As mentioned, the average height of the head is 23cm, and the facial skeleton begins at the midpoint, around 12cm. This makes it roughly the size of your hand.
14 bones make up the facial skeleton (some of which are paired); The Maxilla, Zygomatic, Lacrimal, Nasal, Vomer, Palatine bones, the Mandible and also the Nasal Concha.

Humans have evolved to pay special attention to human faces and recognise them despite their various complexities and tricky shapes. The good news is that it is largely symmetrical and only has one moving part, the Mandible (also known as the jawbone).
Proportions of the Human Skull
Having identified the major components of the human skull, we will now look at the basic proportions using 1) Midpoint of the skull, 2) the Rule of Thirds 3) Widest points of the skull.
Midpoint of the Skull
Find the midpoint of the skull by dividing it with a horizontal line roughly placed across the eye-line and will assist in positioning the location of the eyes. This is the same line we used to separate the cranial and facial masses from one another.
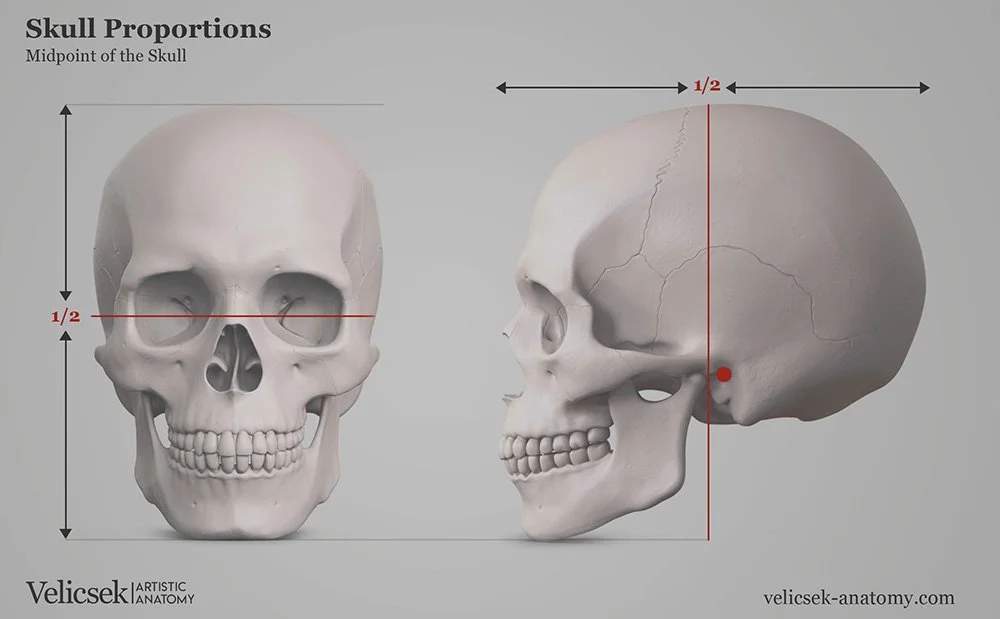
From the profile view, divide the skull through the ear canal (external acoustic meatus) immediately behind the mandible. This will help position the ear.
Rule of Thirds
Using the rule of thirds, we can divide the skull into three equal sized regions, this will accurately define three important segments of the head. Segment one spans from the top of the frontal bone, to the bottom of the frontal bone around the brow-line.
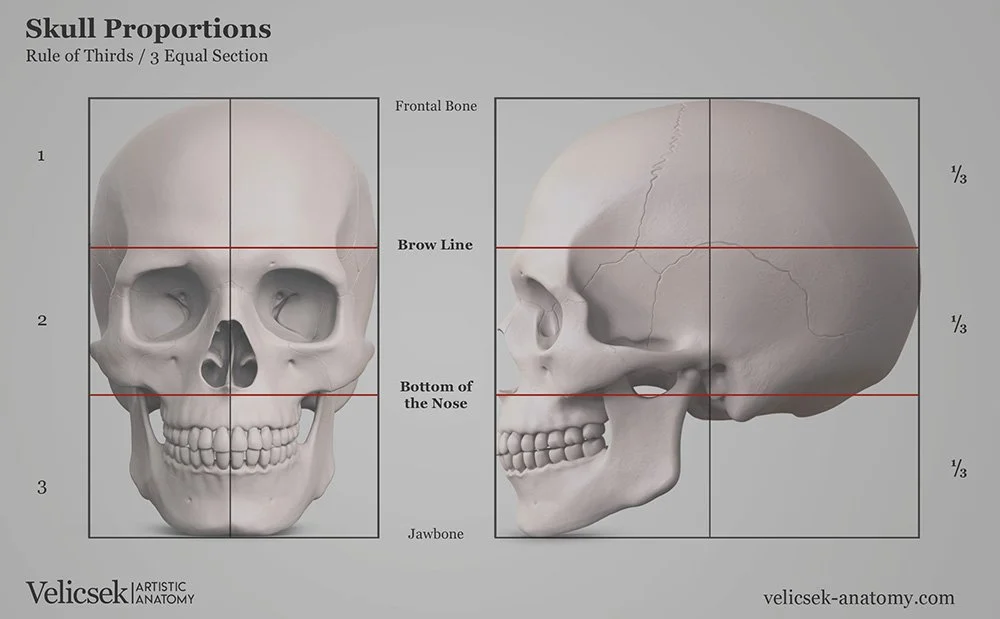
Segment two, extends below from the brow-line and ends at the bottom of the nose (nasal aperture). This segment will contain the bony orbit that contains the eye, cheekbones and the nasal cavity.
Segment three extends from the bottom of the nose (nasal aperture) to the bottom of the maxilla. This segment contains the Mandible (jawbone) and the teeth.
We will take a closer look at each segment in more detail later.
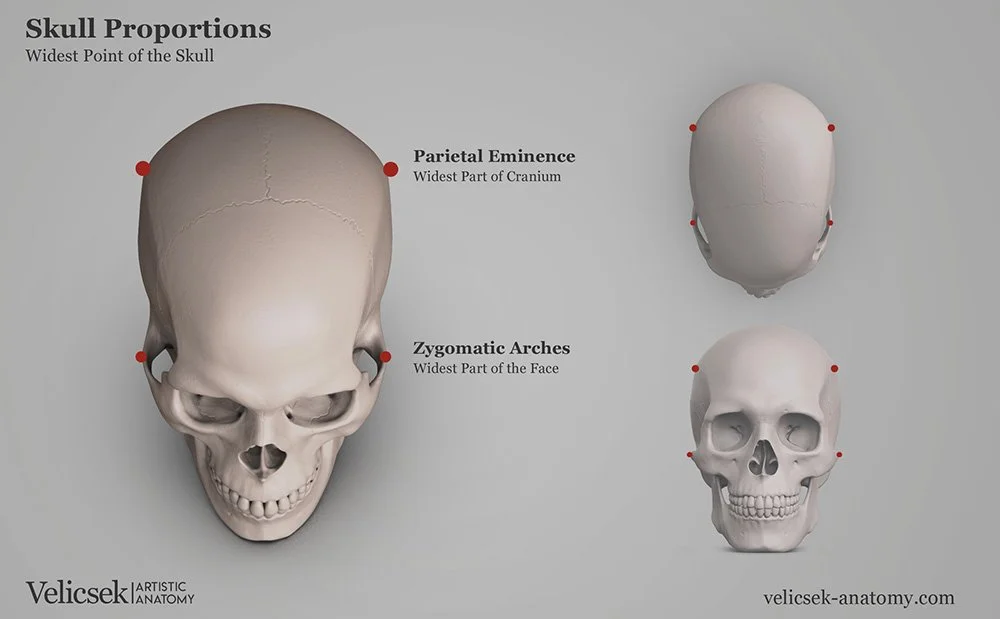
Widest Points of the Skull
Understanding where the widest part of the skull is located can help us define the borders of the overall head and the boundaries of our workspace. This will make it easier to place key landmarks.
The widest part of the cranium is called the Parietal Eminence. The widest part of the face is between the two zygomatic arches (the connection between the Zygomatic bone and Temporal bone. Using the zygomatic arches can help define facial proportions and act as a key landmark we can use to compare the rest of the face to.
Conclusion
The skull and human face is an attractive area for many artists, although it can be complicated to navigate. However, learning the location of the main building blocks that constitute the skull and using some key measurements to break the head up into smaller regions can help any artist begin to get their bearings. Together these will help us achieve better and faster results to build a strong foundation that will ultimately help avoid future confusion and second guessing.